This pendant use only 2 basic knots, horizontal double half hitch for the butterfly wing and spiral stitch for ending, take only short time and very easy to make.
Materials
1. Pendant, I choose tear drop Stone (lapis lazuli) size around 2 cm. height.
2. Waxed cord size 1.0mm. total around 1,040cm.(10.40 meters or 11 yards)
- 1 holding cord 160 cm.
- 6 short working cord, 40 cm each
- 4 long working cord, 160 cm each. This will be for making necklace line.
3. Beads, I choose Nickel free brass beads, size 4.0mm=2 pieces + size 3.2mm= 6 pieces
Instructions
There are 3 part to make this pendant,
1. 1st row Foundation
2. Wings(left and right) 2-9 row
3. Necklace line
1. 1st row Foundation
1.1 Thread the holding cord 160 cm. into your pendant, leave the rest of left and right side of the cord equally.
I use chocolate colors for holding cord to make it different from working cord, but in real work they should be the same color.
1.2 Work on right side of pendant first,
Fold the short 40cm. working cord(khaki color) into the half, at the mid point, knot working cord to the holding cord as in the picture, tighten the knot firmly.
Now you will get 1 of horizontal half hitch and 2 of 20cm. cord.
1.4 Continuing (1.2+1.3) with 2 more short (40cm.)working cords.
1.5 Continuing (1.2+1.3) with 2 more long(160cm.) working cords. You will get 10 working cords now.
1.6 Doing same process(1.2-1.5) with the left side of pendant.
1.7 You will get 2 side of horizontal (double) half hitch line,
1.8 Flip your work to work on the top side. Knot holding cord together.
1.9 You are now complete 1st row Foundation.
---------------------------------------------------------------
2. Wings(left and right) 2-9 row
 |
| Horizontal or double half hitch bar (to the right), Remember that to do this knot you have to pull 2 knots for 1 cord. |
2nd row: We will start with 2nd row, There will be 10 working cords now, knot the horizontal(double) half hitch to the left from 1-10 cord.
You will finish the 2nd row of horizontal half hitch.
3rd row: Starting the 3rd row from the 10 cord, this row holding cord will be hold to the right
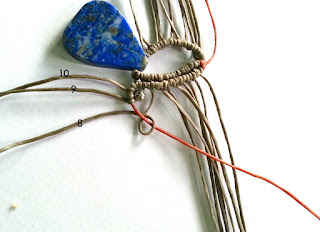
Thread 4.0mm beads into 9 cord before knot the horizontal(double) half hitch.
Continuing knot the horizontal(double) half hitch from left to right side. Make sure that your knot are tighten firmly and closely to the 1st row.
4th row: Start knotting the 4th row to the left, from 1-9 cord.(skip 10 cord for this row)
 |
| the 4 th row will skip the 10 cord (leftest cord) |
5th row:Start knotting the 5th row to the right, from 9-1 cord.
Thread 1 bead 3.2mm into 8 cord before knot the horizontal(double) half hitch.
6th row: Start knotting the 6th row to the left, from 1-7 cord. (skip 8, 9 cord for this row)
7th row: Start knotting the 7th row to the right, from 7-1 cord. Thread 1 bead 3.2mm into 6 cord before knot the horizontal(double) half hitch.
8th row: Start knotting the 8th row to the left, from 1-5 cord. (skip 7, 6 cord for this row)
9th row: Start knotting the 9th row to the right, from 5-1 cord. Thread 1 bead 3.2mm into 4 cord before knot the horizontal(double) half hitch. NOW YOU FINISH RIGHT WING!!
 |
| On back side when cut and burn the cord. Burning spot will hide here. |
 |
| There will be 5 cords each for left and right necklace line |
---------------------------------------------------------------
3. Necklace line
3.1 Knot 5 spiral stich knots will 3 fillers.3.2 Cut and burn 2 working cord to secure the whole work. There will be 2-3 cords left that you can braid to make a necklace line.


This tutorial looks very clear and I really like the design. I will be trying this soon. Thanks.
ReplyDeleteThanks for the tutorial
ReplyDeleteI'm been looking for it ..very well explain for me😍😍😍
Thank you for the tutorial , very easy to understand , will make it soon.
ReplyDeleteEste tutorial es muy didáctico e instructivo, me encantó y segura que lo intentaré 🤩
ReplyDeleteMe encanto. Espero ver muchos más. Si ya tienes. Como puedo hacer para verlos?
ReplyDeleteMuchas gracias por compartir tu talento
ReplyDeleteMuchas gracias!
ReplyDelete