This is a basic work for a stone bracelet, which has a simple,classic style and can be easily adapt to many patterns you like.
Before working this project you must practice
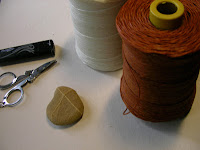
Materials :
- 1 No holed object in round shape (Stone, Gemstone, coin, ceramic, bead, etc.) : diameter around 2.5cm.(1 inch)
- Cords ( waxed cord no.3 /1 mm. thick) which are;
For stone wrapping part
2 holding cords, 30 cm. each
2 working cords,10 times of the stone perimeter each.
For bracelet part
14 cords ( 7 cords each left and right side //3 color , 4 brown, 2 orange and 1 white)
Instructions: There are 2 structures making this work, first you Macrame wrapping around stone , second you make the bracelet part attached to the stone left then right side .
Step 1
- Wrapping your stone with macrame wrapping: Lace style .
- Burnt the end of all cord at the back side of your stone.
Step 2 : Work on back side of the stone.
- On the left side, count the number of larks head knot started from the middle knot on the left side to the top of stone, you will see there are 7 knots, it means you need 7 cords to work with.
- Thread 7 cords into the space between each knots as in the picture.
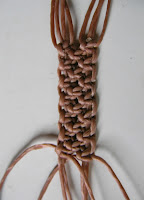
Step 3 Work on front side,There are 2 side of cords, 7 cords each left and right.
Start with left side,
- Tie the double half hitch bar, the holding cord will be on the left of working cord, tie the holding cord to the right. Make sure that each knot is closed to the wrapping part.
Then work on the right side,
- Tie the double half hitch bar, the holding cord will be on the right of working cord, tie the holding cord to the left. Make sure that each knot is closed to the wrapping part.
Step 4
- Now the holding cord on the left and right works are in the middle, tie them in the square knot without filler. You just complete the first row of chevron shape.
Step 5
- Repeat step 3-4 until the length of the work is reach the half of your wrist perimeter.
Step 6
- Keep 6 cords in the middle for tying chain braid, Cut the rest and burnt it at the back side of your work.
Step 7
- Continuing on the right side of the stone. Repeat Step 2-6.
 |
| Front side of bracelet |
 |
Back side of bracelet
|